

When you select this option, the following menu appears:
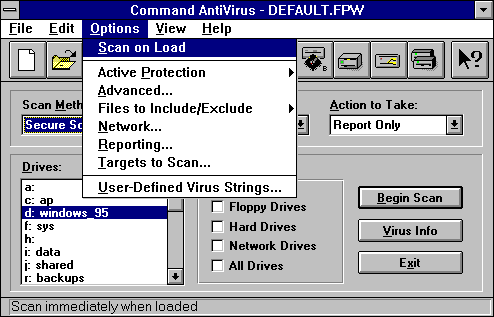
Options Menu
The following section describes these menu options menu items in detail.
This item allows you to perform a scan automatically each time you run Command AntiVirus from Windows.
Selecting this item places a check mark next to the item. Selecting the item again clears the check mark. Once you have selected the item, you must save your settings in a configuration file, for example, DEFAULT.FPW. For more information, refer to File Menu located previously in this chapter.
Now, when you double-click on the Command AntiVirus icon in the Command AntiVirus window, the program automatically begins a scan. If the program finds an infection, the summary dialog box appears.
 |
NOTE: If you want a scan to run automatically every time you launch Windows, the Command AntiVirus icon must be copied to your Startup group. You can edit the properties of the icon to run the program minimized. |
When you select this item, the system displays a sub-menu that allows you to modify the Dynamic Virus Protection (DVP) and select the type of memory to scan.
The following section describes the Active Protection sub-menu items in detail:
Dynamic Virus Protection
DVP provides real-time protection against viruses by providing transparent, real-time scans of each program run in the Windows environment. This includes programs from the hard drive, a floppy disk, or CD-ROM, and the boot sector of each floppy disk that is read. The moment you place a floppy disk or CD-ROM in the drive and run or copy a program, the system automatically scans the program for you.
Real-time scanning, an important element of protection, prevents your system from becoming infected between full scans.
When you select this option, the following dialog box appears:
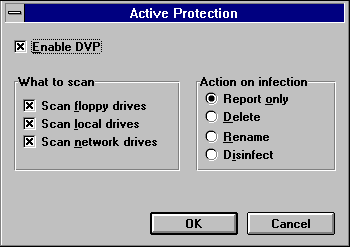
Active Protection Dialog Box
The following descriptions will help you decide which options to select:
Enable DVP
You must select this check box for real&-time virus protection to be active. You can choose to scan floppy drives, local hard drives and/or network drives.
What to Scan
If you have activated DVP, you can then select the drives the program should scan from the choices listed.
Action on infection
This section allows you to select any one of the following options:
Report Only
This option displays the results in a report box at the end of the scan. The program takes no other action.
Delete
 |
This option deletes infected files automatically. While this option is powerful, the potential exists for loss of data. Some viruses encrypt portions of the hard disk. When the program removes the virus, the encrypted portions are lost. |
Be sure that you have virus-free backups for all installed software and files before choosing this option.
Rename
 |
NOTE: This option renames infected files so that their extensions begin with a V. For example, if a file named TRAVERS.EXE contains a virus, the program renames the file to TRAVERS.VXE. Because you cannot run files with a VXE extension, these files are not a threat to your system. |
Before Command AntiVirus renames the suspected file, the program asks you if you want the file extension changed.
Use this option if you want to study the infected file or compare it to a virus-free backup copy.
Disinfect
 |
This option deletes infected files automatically. While this option is powerful, the potential exists for loss of data. Some viruses encrypt portions of the hard disk. When the program removes the virus, the encrypted portions are lost. |
This option disinfects infected files automatically. No prompt appears prior to disinfection. We do not recommend Disinfect as some viruses encrypt portions of the hard disk. When the program removes the virus, the encrypted portions are lost.
Be sure that you have virus-free backups for all installed software and files before choosing this option.
Memory Scanning
This option allows you to select the area of memory that you want to scan or to select skipping the memory scan. We recommend scanning memory whenever you start your system.
Some systems have video problems when Upper Memory Blocks or High Memory is scanned so we provide several memory scanning options. When you select Memory Scanning, the following dialog box appears:
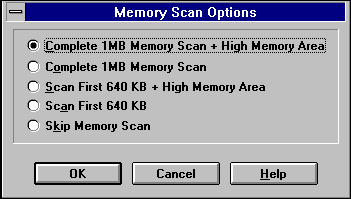
Memory Scan Options Dialog Box
The following descriptions will help you decide which option to select:
Complete 1MB Memory Scan + High Memory Area
This option provides the most comprehensive memory scan and includes the first 64 KB above 1 MB. Some viruses take advantage of this area and if you scan only the first 640 KB or 1MB, you run the risk of infection. If you experience lockups, try the Complete 1MB Memory Scan option.
Complete 1MB Memory Scan
This option provides a thorough scan of the first 1MB of memory, which includes the video area above 640KB. Complete 1MB Memory Scan is the default option. If you experience lockups, use the 640KB + High Memory option.
Scan First 640KB + High Memory Area
This option scans conventional memory plus the High Memory Area, which is the first 64KB above 1MB. This option avoids scanning areas that may have conflicts with some highresolution video drivers and some Micro Channel network cards.
Scan First 640KB
This option scans only conventional memory.
Skip Memory Scan
 |
This option skips the memory scan. Skip Memory Scan saves time but may temporarily allow a virus to escape being detected. |
This option displays the following dialog box that allows you to adjust the default settings. Select or clear the check boxes to make the functions active or inactive.
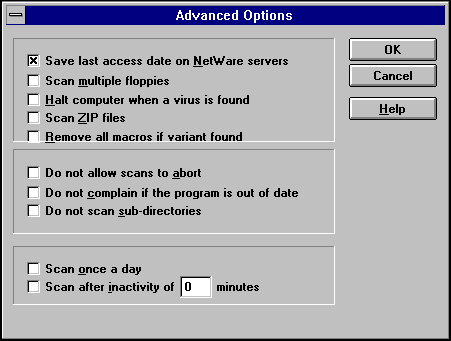
Advanced Options Dialog Box
The following descriptions will help you decide which options to select:
Save Last Access Date on NetWare Servers
 |
This default setting preserves the last access date on NetWare servers. Some backup software packages use the last access date to determine if the file needs to be archived. Preserving the date means that the scan will not have any effect on archival software. Command AntiVirus will automatically skip compressed or migrated files. |
Scan Multiple Floppies
This option scans a large batch of floppies quickly. After completing each diskette scan, the program prompts for another diskette.
Halt Computer When a Virus is Found
 |
This option locks up the computer when a virus is found to insure that no further computing occurs. There is no opportunity to save work in progress. |
Scan ZIP Files
This option scans files that have been compressed with the ZIP utility from PKWare, Inc.
Remove All Macros if Variant Found
 |
This option deletes all macros from any file containing a new or modified variant of a macro virus. Remove all macros if variant found is available only when the selected Action to Take is Disinfect. |
If Remove all macros if variant found is not selected and Action to Take is Disinfect, files that contain remnants or variants of macro infections are renamed.
Do Not Allow Scans to Abort
This option prevents users from exiting during a scan. Incomplete scans can allow a virus to remain hidden on a disk.
Do Not Complain When the Program is Out of Date
This option prevents the display of a message that the program has not been updated within a certain time frame.
We do not recommend using this option. By updating the program regularly, you are certain of having the most current and the most extensive anti-virus protection possible.
Do Not Scan Sub-Directories
This option scans only the drive and directory combinations specified and does not scan the sub-directories under the designated directory.
Scan Once a Day
If you do not automatically scan once a day when you first start your system, this option performs a full scan of memory and the hard drive the first time you enter Windows each day. For more information, refer to Modifying AUTOEXEC.BAT located in the Installation chapter.
For Scan once a day to work, you must copy the Command AntiVirus icon to your Startup group, select the Scan on Load option in the Options menu, and, if applicable, make changes to your AUTOEXEC.BAT. For more information, refer to Scan On Load located previously in this chapter.
Scan After Inactivity of XX Minutes
This option provides a convenient method of scanning when the computer is not active. Specify the number of minutes of inactivity that should pass before the program begins the specified scan. Command AntiVirus must be open or minimized for Scan after inactivity of XX minutes to work.
This option displays a submenu that allows you to add or delete specific file name extensions that you want the program to scan or specific files that you do not want scanned. Extensions and file names entered here apply to all scanning tasks.
Files to Include
When you select this option, the following dialog box appears:
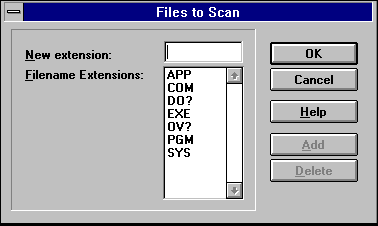
Files to Scan Dialog Box
To add a file name extension to the list, type the three-letter extension in the New Extension text field and click on Add. To remove an extension, select the extension and click on Delete.
When the program begins a scan, all file names with the specified extensions will be scanned.
 |
NOTE: You can add up to 13 additional file extensions (for a total of 20). |
Files to Exclude
When you select this option the following dialog box appears:
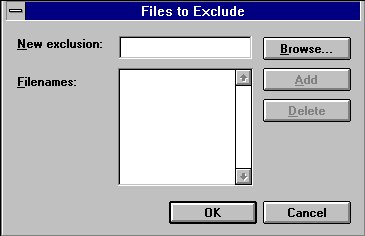
Files to Exclude Dialog Box
To exclude a specific file from a scan, you can click on Browse to locate the file. The program displays an Open dialog box. Select the file name and click on OK and then on Add.
Or, you can type the full file name and extension in the New Exclusion text field and click on Add. To remove a file, select the file and click on Delete.
When the program begins a scan, all specified file names will not be scanned.
The exclusion ability is helpful when you want to scan files with the same extension, but you want to exclude one or more specific files.
The program does not accept wildcards. If you enter only an extension in the New Exclusion text field and that extension is also in the Files to Include list, the program will scan files of that type. To prevent all files of a specific type (for example, all .DOC files) from being scanned, you must remove that extension from the Files to Include list.
If you are using Command AntiVirus for NetWare (CSAV), you can use this option. The Network option allows you to select a CSAV server to receive notices of virus infections. If there is an infection, a notice will be placed in the CSAV server log. If you have both CSAV and AlertTrack installed, the notice will be sent according to the broadcast settings in AlertTrack. Refer to your AlertTrack manual for further information about how to configure Alert Track's messaging abilities.
When you select this option the following dialog box appears:
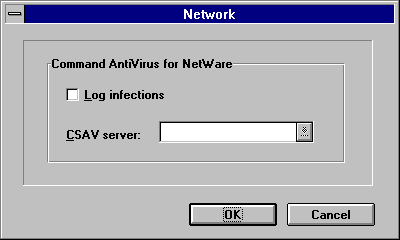
Network Option Dialog Box
To use the Network option, select the Log infections check box. After you have selected the check box, you can select a CSAV server from the CSAV server drop-down list box.
When you select this option, the following dialog box appears:
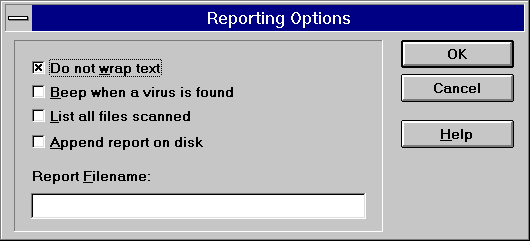
Reporting Options Dialog Box
Do Not Wrap Text
This option allows long path names and scan messages to take up to 255 characters. Each file reported will take one line.
The default report may require horizontal scrolling.
Beep When a Virus is Found
This option provides an audible warning.
List All Files Scanned
This option creates a detailed report.
Append Report on Disk
This option appends your last scan report to the bottom of an existing file. You can transfer this ASCII file to your word processor for formal reports.
Report Filename
This option allows you to name the file used to store the information acquired by scanning. If you supply a name, the program creates the file automatically.
When you select this option, the following dialog box appears:
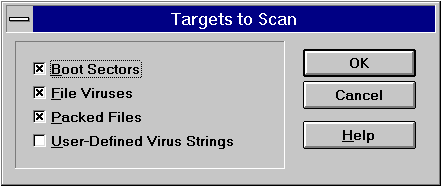
Targets to Scan Dialog Box
From this dialog box, you can select the target Command AntiVirus searches for viruses. The following descriptions will help you decide which options to select.
Boot Sectors
This option scans the master boot records and boot sectors of your hard and floppy disks.
File Viruses
This option scans for viruses, Trojan Horses, and joke programs in your files.
Packed Files
This option scans LZEXE, PKLITE, EXEPACK, DIET, or ICE packed files. To scan ZIP files select the Advanced item from the Options menu. For more information, refer to the Advanced section of Options Menu.
This option allows system administrators to automatically perform partial or full-product updates of Command AntiVirus on each workstation when the user starts the computer. For more information, refer to Automatic Update located in the Network Administration chapter.
Automatic Update also allows each user to manually update a workstation.
 |
NOTE: To use the Automatic Update feature, Command AntiVirus must be installed on your workstation. For new installations, you must run SETUP manually from the workstation. |
When you select Automatic Update, the following dialog box appears:
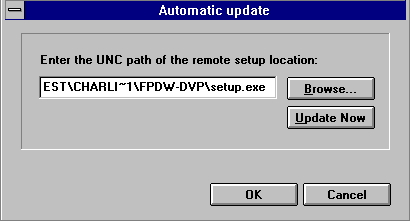
Automatic Update Dialog Box
The Browse button allows you to select the path of the directory containing the latest program files, for example, the latest .DEF and .FPT files. This update directory is referred to as the remote setup location. For more information about the remote setup location, refer to Automatic Update located in the Network Administration chapter.
When you click Browse, the following dialog box appears:
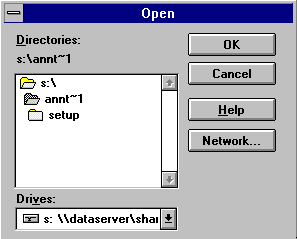
Browse Open Dialog Box
This dialog box allows you to select the drive and path of the remote setup location. Select the drive\path and click OK. The system returns to the Automatic Update dialog box with the selected path entered in the text field.
 |
NOTE: When the drive\path selected is a network drive, the selection is converted to a Universal Naming Convention (UNC) path. |
 |
NOTE: To perform full-product updates, the system administrator must create a subdirectory called setup under the remote setup location. The setup directory must contain a copy of all of the latest product files. For more information, refer to Automatic Update located in the Network Administration chapter. |
Be sure to select the drive and path of the remote setup location regardless of whether you are performing partial or full-product updates.
 |
Be sure to enter the correct path to the remote setup location. Updates will be made from the path specified. |
If the drive is not mapped, click Network. The following dialog box appears:
Network Drive Dialog Box
Select the correct path and click OK to connect the drive. The system returns to the Browse Open Dialog Box.
Once you have selected the path, click OK and continue with the update.

Automatic Update Dialog Box
The Update Now button allows you to update your workstation with the latest program files as soon as you click the button.
 |
NOTE: System Administrators can use the OK button to automatically start the update as soon as the user restarts the computer or if the user leaves the computer on, between 4 a.m. and 5 a.m. |
The program checks the remote directory for any new files and transfers them as necessary. For example, if only the definition (*.def) files have changed since the last update, then only those files will be updated. If a new version has been installed, then the program begins a complete SETUP.
Component updates are not visible. At most, you may notice that the system is a bit slower. With full product updates, the system displays the SETUP screens, but you do not need to take any action.
 |
NOTE: If the dated files require that you restart your system for the changes to take effect, the system displays the following error message: |
"We have updated some files in this release.  These files and some settings will not
take effect until a reboot is performed.  In the interim your
system remains fully protected."
 |
NOTE: To turn off the Automatic Update feature, leave the remote setup location blank. |
This option allows you to add, change, or delete specific search strings that will be part of the search criteria during a scan.
When you select this option, the following dialog box appears:
User-Defined Viruses Dialog Box
This option is useful when a new virus warning is posted and you have not had time to obtain a virus signature update.
To add a new string, click on Add. The following dialog box appears:
Add Virus String Dialog Box
You must provide a name for the virus as well as a hexadecimal series of characters for the search string.
 |
NOTE: Be sure to select the User-Defined Virus Strings option in the Targets to Scan dialog box. For more information, refer to Targets to Scan. |
The View drop-down menu allows you to switch between the Scan Options View and the Scan Results View.
| You can also use the Switch Views button on the toolbar to switch between the two views. |
The Scan Options View displays the current scan settings.
This view displays the results of the last scan.
 |
NOTE: The Scan Results View is not available until after the program performs a scan. |
The Help drop-down menu contains the following help items:
This item provides an index of help topics for Command AntiVirus.
This item provides basic Windows help.
This item provides contact information for Command Software support.
This item provides information on the number of viruses Command AntiVirus detects.
This item lists the more common viruses that Command AntiVirus detects. Command AntiVirus detects thousands of variants that are not listed. When you select this item the following dialog box appears:
Virus Information Dialog Box
To view information on a virus, select the name of the virus from the list. You can type the first letter of the virus name to jump to that group of viruses. The window on the right side of the dialog box provides information about the selected virus.
If you select all or part of the information in this window, you can copy the highlighted area to the clipboard by clicking on Copy. You can then paste this information into another Windows application such as Windows Write.
Click on Close to exit this view.
This item provides version and copyright information on Command AntiVirus.
The toolbar consists of a row of command buttons directly under the menu bar. You can use these buttons to complete some of the more common functions.
| Selecting this button gives you a pointer with a question mark. Point this marker at any option in the Scan Options View and click once. The system displays a help screen containing information on that option. Clicking on the button a second time closes this help screen. |
While moving through a help screen the pointer will occasionally change to a hand symbol. This hand indicates a hypertext file containing additional information. Double-click anywhere on the block of text where the hand appears and the system displays information on that topic.
After each scan, the system displays the following Scan Results View. You can print this report by clicking on the printer button or by selecting an area within the text and copying that area to the clipboard. You can generate formal management reports by inserting the captured text into a word processing document.
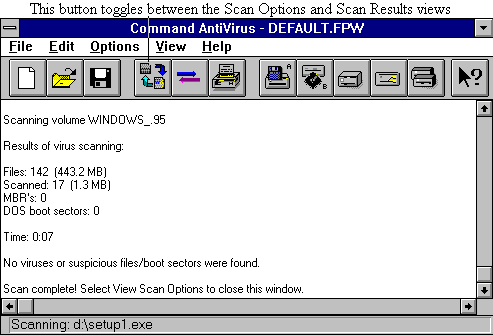
Scan Results View
 |
NOTE: Use the scroll bars or the arrow keys to move through the scan results. Be sure to check the beginning of the report for a boot sector virus. |
If the scanning process reports a boot-sector virus on the hard drive or a virus in memory, you will have to perform a cold boot from a virus-free, write-protected system disk in order to disinfect. For more information refer to If a Virus is Found in the Installation chapter.
Real-time scanning, an important element of protection prevents your system from becoming infected between full scans. This real-time protection is provided in Windows through either Dynamic Virus Protection (DVP) or VIRSTOP. DVP is a virtual device driver (VxD) for the Windows environment. VIRSTOP.EXE is a Terminate and Stay Resident (TSR) program.
Although Command AntiVirus installs DVP in Windows as the default, you can choose either one during installation. Both provide transparent, real-time scans of each program run in the windows environment. This includes programs run from the hard drive, a floppy disk, or CD-ROM, and the boot sector of each floppy disk that is read. In other words, the moment you place a floppy disk or CD-ROM in the drive and run or copy a program, the floppy disk or CDROM is automatically scanned. If DVP is installed, this protection also includes programs run in a DOS box.
While VIRSTOP provides DOS-based real-time protection, it uses a smaller set of virus signatures to conserve memory. Because of these limitations, VIRSTOP detects fewer viruses in comparison to DVP. For example, VIRSTOP does not detect any macro viruses.
Because DVP provides complete virus protection, it is the preferred realtime scanning method. For more information on Dynamic Virus Protection refer to Options Menu located previously in this chapter.
If you do not use DVP for real-time scanning protection in Windows, VIRSTOP.EXE provides a DOS-based transparent, real-time scan of programs that are run. Windows messaging, described below, is required to see the alerts from VIRSTOP.EXE when a virus is found.
The program requires WVIRSTOP to properly display messages of virus activity detected by VIRSTOP. The two files WVIRSTOP.EXE and VIRSTOP.DLL work together with NOVCAST.EXE to provide messages of virus activity.
The installation program copied NOVCAST.EXE to your installation directory. WVIRSTOP.EXE and VIRSTOP.DLL were copied to your Windows directory.
NOVCAST provides broadcasting notification of a virus detected by VIRSTOP for NetWare users. WVIRSTOP displays messages of virus activity detected by VIRSTOP and NOVCAST while in Windows.
NOVCAST must be loaded from DOS after running VIRSTOP and prior to running Microsoft Windows. If you have no desire to have NetWare notification, or you are not operating on a NetWare network, run NOVCAST without command-line switches.
For more information refer to the Network Administration chapter.